Showing posts with label recipe. Show all posts

Monday, August 3, 2015

The time it rained for weeks in Florida

This summer has been a strange one & the last few weeks, Florida has been slammed with rain.  Today I woke up in the wee hours of the morning to non-stop thunder & lightning, accompanied by pelting rain.


This is what the roads near the water look like today. After rounding with patients, I settled into my desk at noon, wondering what I was going to eat for lunch when an email dinged to my phone.  It was the kids' daycare notifying me that daycare would be closing & the kids had to be fetched by 2pm.  That made for a very rushed afternoon!


Thankfully the roads near our house were in good condition so I had no issues.  I used the early start as an opportunity to hit Target & get groceries for the week.  We've been using the Our Groceries app on our Android phones (also available on iPhones) for the past couple of years & I cannot imagine living without it!  Mike & I share a list so if he's at the store & I think of something else, I add to to the list, it pops up on his list & saves me a phone call.  Also, as you're running out of something, you grab your phone & just add it which helps us from smacking ourselves as we come home from the store without something we needed.  It can be used via your phone or computer.  When I come up with a weekly menu, I'll have Pinterest pulled up next to Our Groceries so I can add things straight from the recipe.  I also love that you can organize it by category (ie, produce, dairy, meat, frozen) & as you grab your item, it puts a line through it & moves it to the bottom.  It's awesome!


Today I whipped up a delicious one-pan cheesy broccoli & brown rice casserole.  I got it from Pinterest but used brown rice in place of white which boosts the nutrition value but also greatly increases the cooking time.  It may take longer to cook, but it's super quick to whip up so as it simmers away on the stove top, you've got time to tackle other tasks.

One-Pan Broccoli Cheddar & Brown Rice Casserole
Yield: 6 servings 
Prep time: 15 minutes
Cook time: 1 hour, 45 minutes

-3T EVOO
-1 small yellow onion, finely diced
-1-1.25# boneless, skinless chicken breasts, cut into bite size pieces

-2 cloves garlic, minced
-1 cup brown rice
-1 2/3 cup low sodium chicken broth
-2 heads broccoli, cut into florets
-2c sharp shredded cheddar cheese

1) In a large skillet or pan, saute onions over medium heat with 2T EVOO until softened.  2) In the meantime, cut chicken into bite-sized pieces & season with salt & pepper.  3) Increase heat to medium-high & begin to brown the chicken.  4) Dice garlic & add to pan.  5) Push chicken to one side of the pan, add 1T EVOO, add the uncooked brown rice & saute for a couple of minutes. 6) Add chicken broth, stir to combine, allow mixture to come to a simmer, cover & cook for approximately 1 hour & 15 minutes (if you were to use long-grain white rice, this step would take only 12 minutes to cook & require 2.5c chicken broth).  7) Add broccoli florets & allow to cook an additional 15-20 minutes. 8) Add a cup of shredded cheddar cheese & mix to combine. 9) Top mixture with remaining cheddar cheese, cover for 2 minutes & allow cheese to melt. 10) Eat & enjoy.  P.S. - I highly suggest adding hot sauce such as Cholula!


Since the weather was crummy this past weekend, we had a rare family of four only weekend, laid low & went out for a yummy dinner Saturday evening.


I may have also indulged in a fantastic margarita or two that Mike makes with 3 simple ingredients: Fresh squeezed lime, tequila & triple sec.  Delish!


Sunday after church we headed back to Chuck E. Cheese so Mike could experience the mayhem & madness!  It was a great rain-filled, family oriented weekend!!

post signature

Tuesday, July 28, 2015

Busy fun

Mike headed out of town last Friday morning for a guy's fantasy football weekend getaway at the beach.  That meant that I was flying solo Friday-Sunday afternoon, but I'm always up for a challenge to keep things interesting!


We've had an insane amount of rain lately (which I happen to love since you rarely get a solid rainy day in the Sunshine state) so we kicked off the weekend by wading our way to dinner with friends we haven't seen in forever.  They have an eighteen month old little boy & I hadn't met him until that night, so it was great to get back together.


The kids have been talking about a sleepover for a while so I settled them in the back bedroom for a brother/sister slumber party after dinner.  They lasted about an hour until Reese declared that she wanted to sleep in her own bed.  Cam insisted he was going to stay in that room, but two minutes later, he was also fast asleep in his own bed.  So much for that!  After the kiddos went to bed, I had a blissful night of sipping wine while watching, Return to Me... it was heavenly!


Saturday afternoon I met my besties for a mom/kiddo day at Chuck E Cheese.  We have a new location near our house yet we've never been & we ended up having so much fun!


$20 bought us 80 tokens which was plenty to keep Cam & Reese occupied since each game takes one token.  After pizza the mommies indulged in a beer over some chit chat while the kids continued to have a ball... win, win!

We're three!

We did an impromptu photo shoot with the little goofballs & the pics turned out pretty darn cute!

We're six!

We're silly!

We're awesome!
I'm a ladies man!

Mommy/kiddo/Pug Saturday movie night

It ended up being a really low-key yet fun-filled weekend, although it was great when we came back from church Sunday to find that Mike had returned!

Turquoise organizer from Target ($13)

I'm getting a jump start on my Wednesday organization by tackling the horrific junk drawer in our kitchen.  Since these drawers get the name "junk drawer" I'm assuming I'm not the only person who has issues keeping theirs organized??!


Batteries, tape, screws, checkbooks, etc gather in this drawer & it had gotten quite messy!


The after picture still looks pretty messy, but I assure you I did get rid of a lot of unused junk.  When you have a bunch of random, small items gathered in one drawer, it's had to keep it looking pretty!


I did my organizing while a SUPER quick dinner cooked in the oven.  It took no longer than 10 minutes to assemble & 20-25 minutes to cook.  Love me a one pan meal!

One-pan ranch chicken & roasted tomato green beans

-1.25# boneless, skinless chicken breasts
-1oz pack dry ranch dressing mix
-Seasoned breadcrumbs (about a cup)
-Fresh green beans, ends trimmed
-Pint cherry or grape tomatoes (cut in half if desired)

Preheat oven to 400 degrees.  Line a baking sheet with foil sprayed with non-stick spray. Slice chicken breasts into tenders & drizzle with olive oil.  Mix ranch packet & breadcrumbs into gallon zip bag, toss in chicken tenders & shake to coat.  Place chicken on one side of the baking sheet.  Toss green beans in olive oil, salt & pepper & place on the opposite side of the same baking sheet. Bake for ten minutes in preheated oven.  Meanwhile, toss the tomatoes in olive oil, salt & pepper & top green bean mixture.  Bake for an additional ten minutes & enjoy.  Super easy, healthy weeknight meal!


 Speaking of getting a jump on Wednesday organizing, my dryer just buzzed... the dreaded sound.  Sometimes when it goes off I think to myself, "I hate you!"  It's always pulling me away from something I'd rather be doing, like watching TV, blogging, browsing online, reading a magazine... basically anything else! 

On a sad note, my heart is feeling heavy tonight after finding out that a blogger I've followed for years passed away yesterday after complications from a heart issue.  It's amazing how in the blogging world, you can feel like you know someone you've never met & be affected by what's happening in their livesShe was young, bubbly, seemed happily married & had two very small children, so it's a tragic ending to a sweet story I've followed.  Saying my prayers for her family tonight!!
 
post signature

Monday, December 29, 2014

Christmas 2014

Holy cow, how is Christmas already over?!  It went by so fast that I feel like I have whiplash.  Nonetheless, we had a really awesome time filled with family & lots of food!


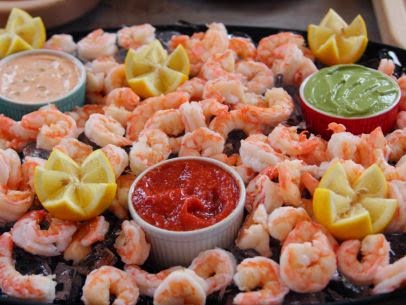
We always have appetizers vs. a meal on Christmas Eve & since I had to work that day, I made sure to pick recipes that could be made the day before.  The Pioneer Woman inspired me to do shrimp cocktail with various dipping sauces.  I took a shortcut with the cocktail sauce & just used store bought with extra horseradish stirred in since we like it hot! 

{Source}

 I made a remoulade sauce from The Chew which was super tasty, but the cocktail sauce was the hit, so I'd stick to basics next time & skip the special sauce.

{Source}

I also whipped up Pioneer Woman's holiday tortilla roll-ups which were a cinch to make the night before.  I wrapped them in plastic wrap, stuck them in the fridge & cut them just before serving & they were a huge hit.

{Source}
 If you haven't guessed, I rely very heavily on the Pioneer Woman... absolutely adore the lady & her delish recipes.  They're always easy to make & mega crowd pleasers.  In keeping with the theme, I also made Pioneer Woman's bacon wrapped dates which were so exceptionally yummy!


{Source}

I made them ahead, put them on a baking sheet with a wire rack so the grease could drip off as they cooked & popped them in the oven when we were ready for them.  They were the perfect combo of sweet, salty & crunchy.  I will definitely be making these again!


Okay, enough about the food, lets move on to the family!  The kids had a ball playing around the back yard before it was time for presents.


This little girl can always be found swinging in the backyard, even if it's in a dress & cowboy boots!


It's hard to believe how quickly the kids are growing & changing as the years go by!  


I cherish the holidays that bring us all together!


Cameron has been wanting the Wii U since before last Christmas & he finally got it this year.  He was off the wall excited when he opened it & got a bunch of games from everyone to supplement it. Unfortunately, when Mike went to hook it up, it was a completely dead unit.  The poor kid was so crushed & each game he opened only rubbed salt in his little wound.  Mike had to go back to Walmart at 6am the day after Christmas & luckily exchanged it for a working unit, yay!


It was an absolute Christmas miracle when I opened my new KitchenAid mixer... could not believe my eyes when I saw this turquoise beauty!  Mike blew me away with this one & I cannot wait to try it out!!!  Hope you all had a very Merry Christmas too!

post signature

Tuesday, December 16, 2014

Cookie making fools!

I hadn't planned on baking as much as I have this season, but Cameron has been majorly into it & constantly asking if we could "please bake more tonight!"  Since cookies have such basic ingredients, we usually have most everything we need on hand to whip up different recipes.  Here are some of the cookies we've baked so far..

{source}

I made these chocolate peppermint crinkle cookies last year & they were so tasty that I couldn't resist making them again.

{source}
You cannot go wrong with classic Nestle Tollhouse chocolate chip cookies... so, so yummy!  These are dangerous for me to make since I cannot stop eating the dough.  The cookies themselves never tempt me, only the dough & I prefer it before the chocolate chips are added.  It's the devil.


After work Friday, we whipped up a batch of chocolate chip peanut butter oatmeal cookies.  I used a recipe that my co-worker shared, but this recipe below is very similar. 

{source}
You can never go wrong with chocolate & peanut butter.. it's a match made in heaven!  I love the texture the oats give the cookie (or the batter, in this case, since again, my weakness!)


I've never made gingerbread cookies before, but with some push from Cameron, it was a first for me this weekend.  I made Pioneer Woman's recipe & I have to say, I just don't think I'm a fan of gingerbread cookies in general.  It may be the taste of molasses I just don't like.

{source}
If you decide to make this recipe, definitely go on the low end of the cooking time since our thinner cookies got way too dark.   Keep an eye on the color as it gets close to the end of cooking time since 16 minutes was a little much, but it could just be our oven.


Cam & his friend Avery had a blast decorating them, but as you can see, Reese wanted nothing to do with it.  Note: Apparently Cam likes decorating cookies in his Sonic Halloween costume!


We picked up some pre-assembled gingerbread houses at Walmart & the kids decorated them Saturday morning.  Pajama-clad, bedhead Reese didn't have much of an attention span for the project.


But Cameron concentrated enough for the both of them & spent at least an hour perfecting his house.  I foresee that he's going to be quite the family man when he grows up.. he loves doing homey, family projects.  Such a love!


Their houses are displayed on our fridge, adding to the festiveness of the season!

post signature

Tuesday, December 9, 2014

3 ingredient homemade body butter

I love making homemade Christmas presents each year whether it be a food item or beauty item.  Last year I made a brown sugar scrub for the shower & this year, after perusing Pinterest, I decided to try a homemade body butter.


The ingredients involved are very simplistic:  Raw/pure cocoa butter, coconut oil & essential oil of your choice.  I keep a handful of essential oils on hand, but thought that vanilla would pair well since the cocoa butter has a natural chocolate scent.  For this gift, I had to buy the cocoa butter ($8) & the vanilla essential oil ($6); we already had the coconut oil on hand.  Mike keeps a dish of coconut oil in his bathroom drawer & melts it in a few inches of warm water in the sink while he showers.  He uses it on his skin & hair which he feels has helped a lot.  Mike used to have very irritated/red, flaky skin on his face which is gone since he's using the coconut oil.  Anyway, if you were buying the coconut oil at your local grocery store, you'd end up paying a total of about $22 for the three above items since coconut oil ranges about $8.


Hack up a cup of cocoa butter & a cup of coconut oil with a knife & melt in a pan on medium-low heat which takes about five or so minutes.


 The cocoa butter I bought has an extremely strong chocolate scent which smells really yummy.  We keep our coconut oil in the fridge, so it really firms up.  If you keep it at room temp, it's solid, but much smoother.


Pour your melted ingredients into a bowl & put it into the fridge for a couple of hours to set.  If you keep it in the fridge too long, it'll be hard to blend, so just pop it in the microwave for 10-15 second increments to re-soften but not melt.


Add essential oil of your liking, but really, I don't even think this is a necessary step since the cocoa butter itself is so scented.  I added a good 1-2 teaspoons of vanilla oil until I felt it was to the scent I liked.

I don't have one of those fancy-smanchy KitchenAid mixers...


(Although I desperately want this one!), but my hand mixer worked just fine (though see Q&A below).  Blend until the mixture gets very light & fluffy & place into mason jars of your choice.


I chose 4oz, wide mouth jars since a little body butter goes a long way.  I'll eventually decorate the jar with a bow for Christmas, but haven't gotten around to doing that just yet.  We're at the time of year where there simply aren't enough hours in the day!  I used the recipe from this website, if you want to reference.  Here are some questions I had when looking at the site:

1) How much will this make?  For me, this filled 2 1/2 4oz jars to make a total of about 10-11oz.  The website I referenced said they got 3, 16oz jars out of the same recipe I followed!  I'm not sure if it was the fancy schmancy KitchenAid mixer that made the difference, but that's about a 37oz difference which is so hard to believe.  I whipped that sucker for 10 minutes with my handheld!

2) How many times can you make this recipe with the ingredients purchased?  I'll be able to do it one more time with the amount of cocoa butter I ordered.  I have a lot of essential oil & coconut oil leftover though.

3) Will the body butter stay this fluffy or will the oils begin to separate?  This depends on the temperature of the room it's stored.  If it's in a room that runs hot, it's possible that it may separate or change consistency.

4) How does it feel applied to the skin?  There's no denying that it definitely has an oily feel because of the coconut oil.  I plan to keep mine in my bedside table & apply it before bed.  My skin definitely looked moist & healthy after I applied it & it's much less greasy & has absorbed since I put it on an hour ago.  Living in Florida, I question how much I'll need it, so a little will go a long way.  Obviously if you're from a colder climate, it'll be used much more often.

5) How long will this keep?  The source I referenced said she's had hers for over a year & it's still good.

6) Would you make this again?  I was disappointed with the small quantity my recipe made since I expected around 3, 16oz jars.  Other than that, I love that it's all natural with limited ingredients & I think it really will be affective in combating dry skin.  You can make a good 6, 4oz jars for gifts for under $30 which is very inexpensive compared to store bought body butters.  My verdict is to make this for gifts but double the recipe to get more out of your time spent making it.

post signature